
Build Your Own Epik-inspired App: Transform Selfies into '90s Yearbook Photos with Node.js and AI
Let's build an Epik-style yearbook photo changer using Node.js and AI.


Nostalgia is a powerful force in social media, and the latest retro trend is going back to school with AI-generated yearbook-style photos. Apps like Epik have gone viral on TikTok and Instagram by letting users transform their selfies into stylized portraits that look like they came straight out of a 90s high school yearbook.
In this post, we'll build our own basic yearbook photo changer in Node.js using the Yearbook Pics AI model by Catacolabs hosted on Replicate. Our implementation will let us turn a headshot into a 90s-style yearbook photo. Retro!
We'll learn how to:
Set up a Node.js project with the Replicate client
Make requests to generate yearbook style photos from a supplied input URL
Tweak the model parameters for customization
Render the result in a very basic frontend
And I'll provide the full code at the end. Let's dive in and ride the retro photo trend! By the way, you can subscribe or follow me on Twitter for more content like this!
About the Yearbook Pics Model
For this guide, we'll be using the Yearbook Pics model to transform input images into their yearbook equivalents. The Yearbook Pics model is a creative image-to-image AI that stylizes portraits in the style of 90s high school senior photos.
It takes a headshot photo as input and outputs a transformed image with various retro filters, grain, colors, and other tweaks that give it that classic yearbook vibe.
Under the hood, it uses a Generative Adversarial Network (GAN) architecture optimized for performing this specific style transfer task.
The model was trained by Catacolabs and made conveniently available via the Replicate API.
Building our Epik-style Yearbook Photo App
Alright, let's dive deeper into the technical implementation of the Epik-style app using the yearbook-pics model by catacolabs.
1. Installing Required Libraries:
The very first step to creating our application is to ensure we have the necessary libraries.
replicate: This library allows us to interact with the AI model hosted on Replicate.express: It's a web framework for Node.js that simplifies the creation of web applications.
npm install replicate express
2. Authenticating with Replicate:
The next step is to authenticate our application with Replicate. The API token acts as a key to access the services. As a best practice, we store sensitive data like API tokens as environment variables, so be sure to store your token in your .env file.
const REPLICATE_API_TOKEN = process.env['REPLICATE_API_TOKEN'] // Use your token
3. Initializing the Replicate Client:
After authentication, we initialize the Replicate client which sets up the connection to Replicate's services.
const replicate = new Replicate({
  auth: REPLICATE_API_TOKEN,
});
4. Creating a Function to Interact with the Model:
The function getTransformedImage is defined to handle the interaction with the model. Let's see what it does before we write it.
replicate.run(): This method runs the AI model.The first argument specifies which model to run. Here, it's the
yearbook-picsmodel bycatacolabs. We also provide a version number, which is the long series of numbers and letters you see.The second argument is the input data:
image: The image URL or path that you want to transform. I've included an example image of Elon Musk here. If you build a way for users to upload their own images, you'll need to point to the relevant file here.gender: The gender parameter which can take values 'man', 'woman', or 'unisex'. This influences the style of transformation.seed: An integer value to add randomness to the transformation. If set to 0 or lower, the model will choose a random value.
async function getTransformedImage() {
  try {
    const output = await replicate.run(
      "catacolabs/yearbook-pics:556bdffb674f9397e6f70d1607225f1ee2dad99502d15f44ba19d55103e1cba3",
      {
        input: {
          image: "https://cdn.britannica.com/05/236505-050-17B6E34A/Elon-Musk-2022.jpg",
          gender: "man",
          seed: 32430
        }
      }
    );
    console.log("Output from Replicate:", output);
    return output;

  } catch (error) {
    console.error("Error running the model:", error);
  }
}
5. Setting Up the Express Server:
The server will to respond to GET requests at the root ('/') endpoint. When a user visits the server, it runs the getTransformedImage function and displays the transformed image.
app.get('/', async (req, res) => {
  const transformedImageURI = await getTransformedImage();
  res.send(`
    <h1>Your '90s Yearbook Photo</h1>
    <img src="${transformedImageURI}" alt="Transformed Image" />
  `);
});

app.listen(PORT, () => {
  console.log(`Server is running on http://localhost:${PORT}`);
});
6. Running the Application:
Save the provided code in a file, say app.js. Ensure you have Node.js installed, then run:
node app.js
This will start the server, and when you visit http://localhost:3000, you'll see the transformed image of Elon Musk as a '90s yearbook photo. What a beautiful site! Here's my implementation, running on Replit.
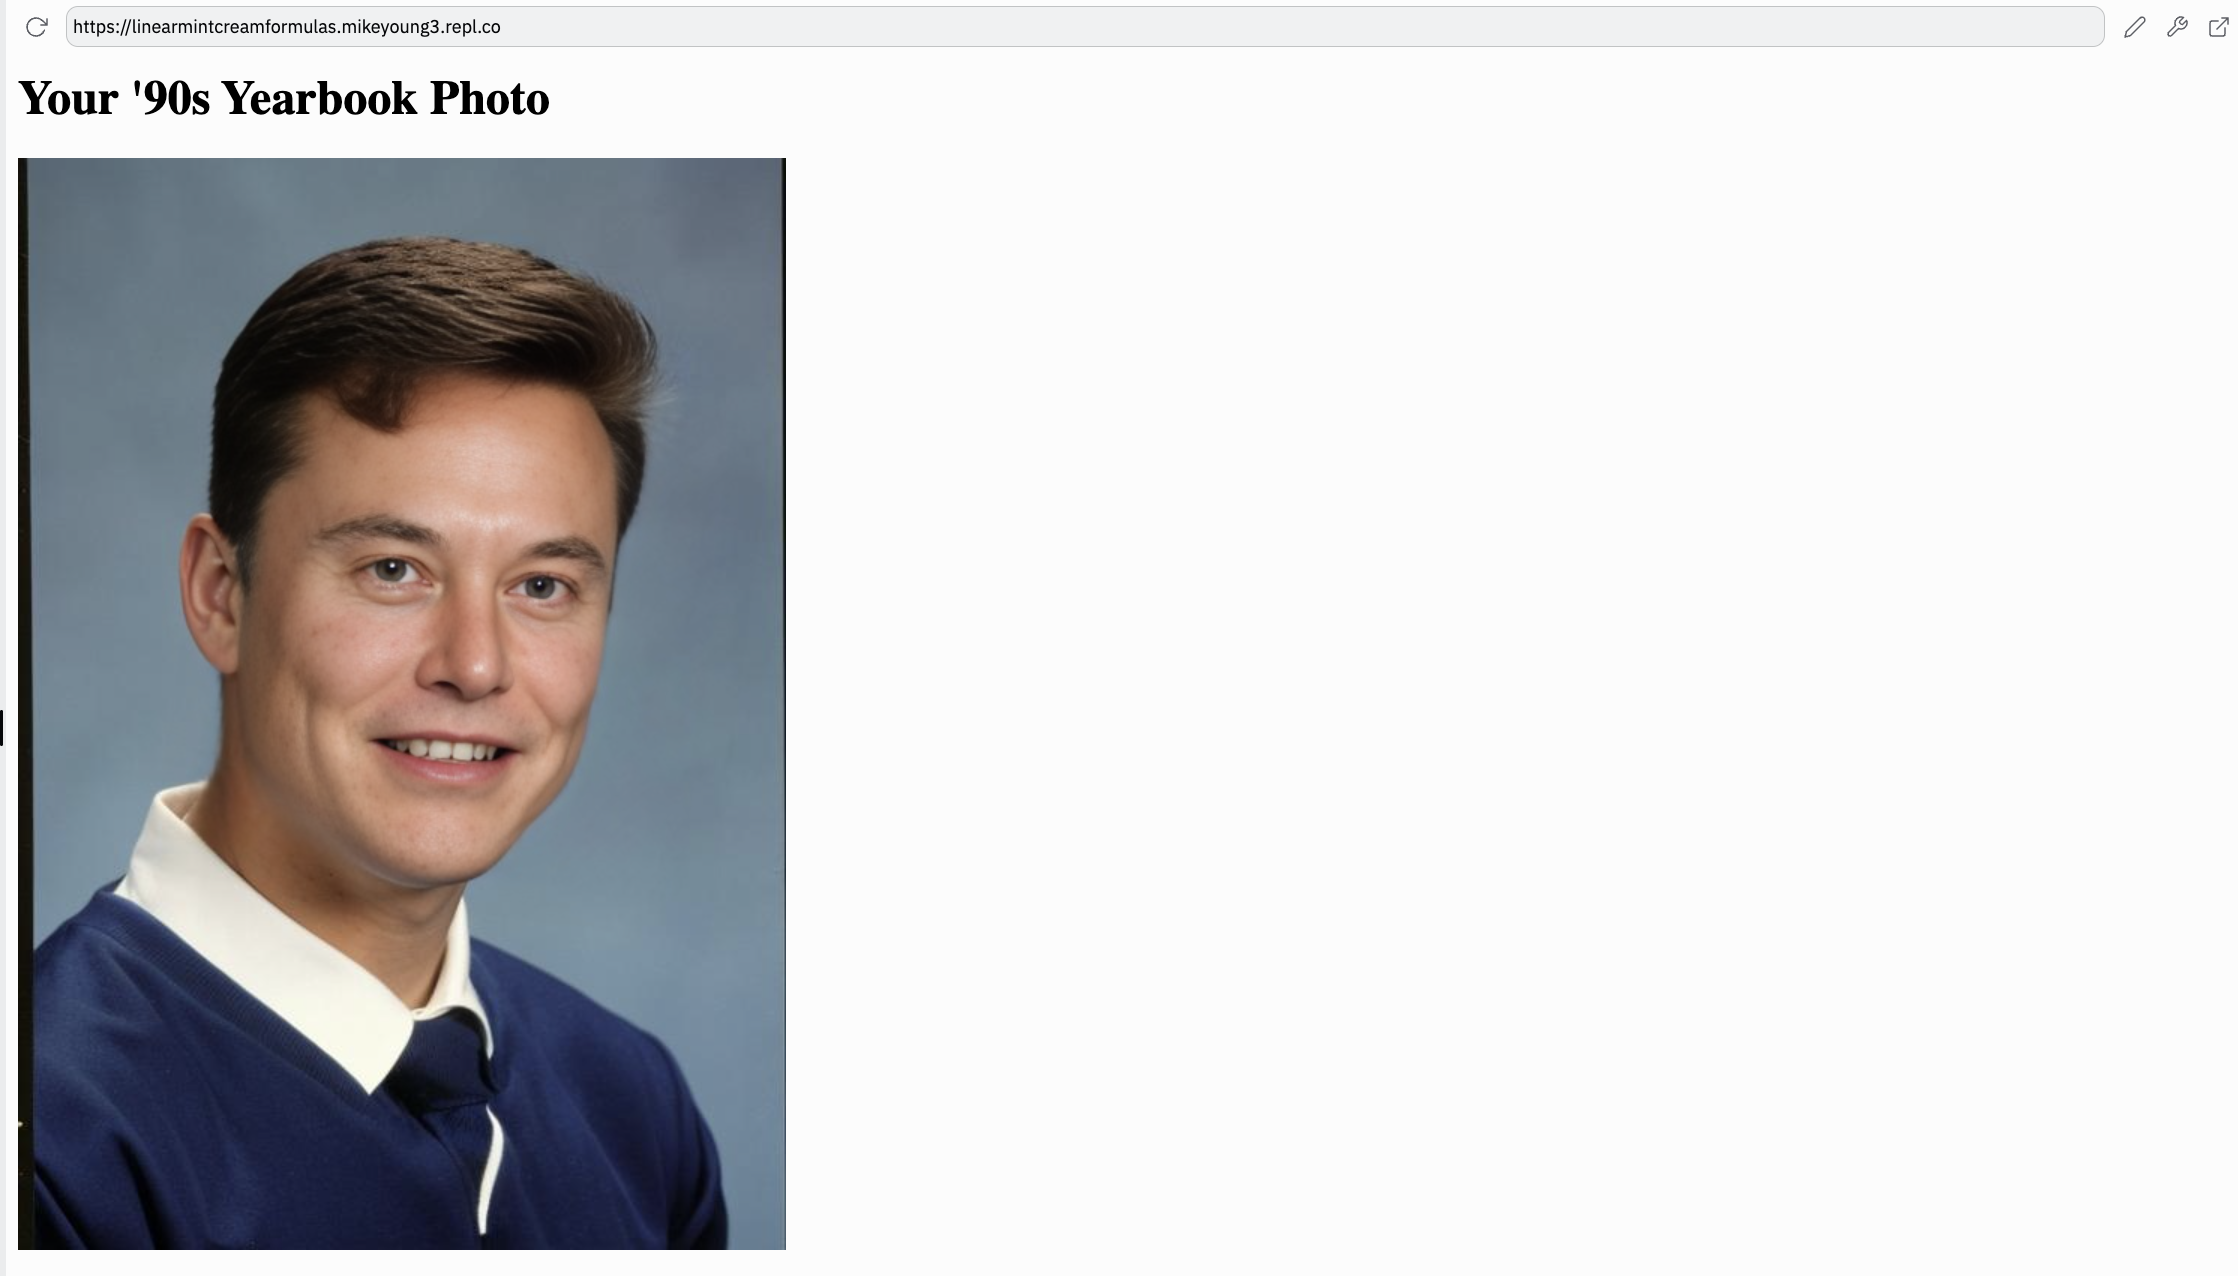
Here's the result, running in Replit.
And here's the full code, if you're lazy and just want to copy:
const Replicate = require('replicate');
const express = require('express');

const app = express();
const PORT = 3000;

const REPLICATE_API_TOKEN = process.env['REPLICATE_API_TOKEN']// Use your token

const replicate = new Replicate({
  auth: REPLICATE_API_TOKEN,
});

async function getTransformedImage() {
  try{
  const output = await replicate.run(
     "catacolabs/yearbook-pics:556bdffb674f9397e6f70d1607225f1ee2dad99502d15f44ba19d55103e1cba3",
    {
      input: {
        image: "https://cdn.britannica.com/05/236505-050-17B6E34A/Elon-Musk-2022.jpg",  // Replace with path or URL of the image
        gender: "man",
        seed: 32430
      }
    }
  );
  return output;
  console.log("Output from Replicate:", output);

  } catch (error) {
  console.error("Error running the model:", error);
}

}

app.get('/', async (req, res) => {
  const transformedImageURI = await getTransformedImage();
  res.send(`
    <h1>Your '90s Yearbook Photo</h1>
    <img src="${transformedImageURI}" alt="Transformed Image" />
  `);
});

app.listen(PORT, () => {
  console.log(`Server is running on http://localhost:${PORT}`);
});
Taking It Further
Building a basic application is just the starting point. There's so much more you can add to enhance the user experience, add functionality, and potentially monetize the service. Here are five recommendations to take your Epik-inspired app to the next level:
1. Image Upload Capability:
Rather than using a hardcoded image link, allow users to upload their images directly.
Use
multer, a middleware for Express and Node.js, to handlemultipart/form-datafor uploading images.Ensure to add an image validation step to check for appropriate file types and sizes.
2. Integrated Payments:
Monetize your application by charging users for premium transformations or bulk transformations.
Integrate with payment gateways like Stripe using the
stripenpm package.Implement a tiered pricing model where basic transformations are free, but advanced features or high-resolution images come at a cost.
3. Explore Different Models:
With the vast repository of AI models on AIModels.fyi, you can expand the application's functionality.
Offer different styles or decades of yearbook transformations.
Introduce models that not only transform images but also add filters, text, or other special effects, like cartoonification.
4. Enhance User Experience (UX):
Currently, the application is barebones. Improve the user experience by:
Adding a sleek UI using frameworks like React or Vue.js.
Implementing feedback mechanisms like loading spinners to indicate when the model is processing.
Offering a gallery view of previous transformations for users to see and compare.
5. User Profiles and History:
Allow users to create profiles to save and revisit their past transformations.
Use MongoDB or PostgreSQL to save user data and their transformation history.
Add a feature for users to share their transformations directly on social media platforms.
Summary
In this post, we walked through building a basic Node.js app to create nostalgic 90s-style yearbook photos using AI.
The key steps were:
Setting up the required Node.js libraries like Replicate and Express
Authenticating with Replicate to access the API
Calling the Yearbook Pics model with an input image to stylize
Building an Express server to display the transformed photo
By leveraging the pre-trained Yearbook Pics model, we can easily generate retro-filtered images without needing to build our own AI system from scratch.
Conclusion
This post showed how Node.js and Replicate provide a quick and flexible way to integrate AI models like Yearbook Pics into an application. They allow anyone to spin up their own basic yearbook photo transformer.
Of course, there is additional potential to enhance the app by adding features like image uploads, user profiles, payments, and more photo effects. The Replicate ecosystem offers many creative AI models to experiment with.
I think this tutorial demonstrated how developers can rapidly prototype and build AI-powered apps. With just a few lines of code, we tapped into state-of-the-art generative capabilities using a pre-trained model.
The world of AI is expanding rapidly, providing amazing new possibilities for developers. I hope you feel inspired to explore further and build your own unique applications enhanced by AI!
Be sure to check out the links and subscribe for more tutorials and AI news soon. Thanks for reading.
Subscribe or follow me on Twitter for more content like this!